Getting Started
This guide is a "Hello World"-style tutorial which will show you how to build a basic application using Temple. You will define a simple data model, use Temple to generate a set of microservices, and then deploy the services locally to perform some sample requests.
Before getting started, make sure you have installed the Temple CLI according to the Installation guide.
Project Definition
Temple projects start by defining a data model in our custom Templefile. A data model expresses the different entities within a system, along with their attributes and any relationships between different types of data. The Templefile also includes configuration for how the project will be structured, as well as the components that will be generated.
Start by making a new directory, then move into it:
~ ❯❯❯ mkdir temple-tutorial~ ❯❯❯ cd temple-tutorial~/temple-tutorial ❯❯❯
In this new directory, create a plain text file called example.temple.
Within this file we are going to define a new project and an example service.
Defining a Project
A Templefile must contain a single project block. The project block gives the project a name, and defines the default configuration for generation.
In the example.temple file, let's define a project called ExampleProject, which sets the default language to go, the default database to postgres and configures Docker Compose to orchestrate the project:
ExampleProject: project {#language(go);#database(postgres);#provider(dockerCompose);}
Each declaration that begins with a # is referred to as a metadata item.
Defining a Service
A Templefile can contain one or more service blocks. The service block defines a single microservice within the project and has one or more attributes associated to it. You can think of the attributes as you would columns stored in a database, with each entity in the service defining a value for each attribute. In a database an ID column would usually be defined to uniquely identify each entity, however the Temple framework will automatically generate an ID attribute without needing to include it in the Templefile.
Let's define a service called ExampleService, which has two attributes: a string named foo, and an integer named bar:
ExampleService: service {foo: string;bar: int;}
Temple has several built in types, such as string, int and float, a list of which can be found in the Primitive Datatypes reference.
In addition to this, attributes can also refer to other services, implying a foreign key relationship between the two. More information about this can be found in the Foreign Key guide.
Furthermore, services, like projects, can contain metadata items such as #language or #database.
This allows each service to override the project defaults.
Later guides will explore these in more detail and a complete specification of the Templefile language can be found in the Templefile Specification.
All together, our Templefile reads:
ExampleProject: project {#language(go);#database(postgres);#provider(dockerCompose);}ExampleService: service {foo: string;bar: int;}
Validating a Templefile
The Temple CLI contains a tool for validating your Templefile before generating any code. It can be invoked by providing the path to a Templefile:
~/temple-tutorial ❯❯❯ temple validate example.templeTemplefile validated correctly
Generating Code
To begin code generation, execute temple, including a path to a Templefile as a trailing argument:
~/temple-tutorial ❯❯❯ temple generate example.temple
During this stage, Temple will prompt for more details to customise the generated project.
Since the project definition uses Go, you will be asked to input a Go module name to use for every service in the project.
This can take any value appropriate to your use case, however following Go convention to use the GitHub URL, we'll use github.com/temple/tutorial.
Viewing the Generated Project
By default the project will be output to the current working directory:
.├── api/├── deploy.sh├── docker-compose.yml├── example-service/├── example-service-db/└── kong/
Let's look at each directory and file in turn:
/example-service/- contains the Go code for theExampleServicemicroservice we defined in the Templefile. A full description of this directory's contents can be seen in the Service Architecture section./example-service-db/- This directory contains the SQL init scripts for the database backing theExampleService. These scripts hold the database schema, defining which fields are stored./api/- This directory contains the OpenAPI specification for the project, used for generating client application code. For more information, check out the OpenAPI Generation guide./kong/- Temple projects use Kong as an API Gateway, which routes incoming traffic correct microservice, via a single URL entry point. Thekongdirectory contains a configuration script which correctly configures Kong to forward traffic to the correct services, based on the URL./docker-compose.yml- This file defines how to orchestrate all of the services indocker-compose, including Kong. More information about this can be found in the Orchestration Guide guide./deploy.sh- This shell script provides an automated way to deploy the application for local development, including running all initialization steps and setting environment variables.
Generated Services
By default, each service exposes exposes 4 API endpoints: one for each of the CRUD (Create, Read, Update, Delete) operations. These 4 endpoints are defined at the following URLs:
CREATE:POST /api/example-serviceREAD:GET /api/example-service/{id}UPDATE:PUT /api/example-service/{id}DELETE:DELETE /api/example-service/{id}
Each of these endpoints use JSON encoding for requests and responses, which need to include the attributes defined in the Templefile in the object's body.
Where {id} is used in the path, this should be replaced with the ID of an existing entity in the service, which is returned in the body of a CREATE call.
The OpenAPI specification generated in the /api project folder contains a full API Schema of every endpoint available in the application, including their parameters and possible responses.
This is also outlined in the README.md contained in the root of the project.
System Architecture
The architecture of the generated project is described in the following diagram:
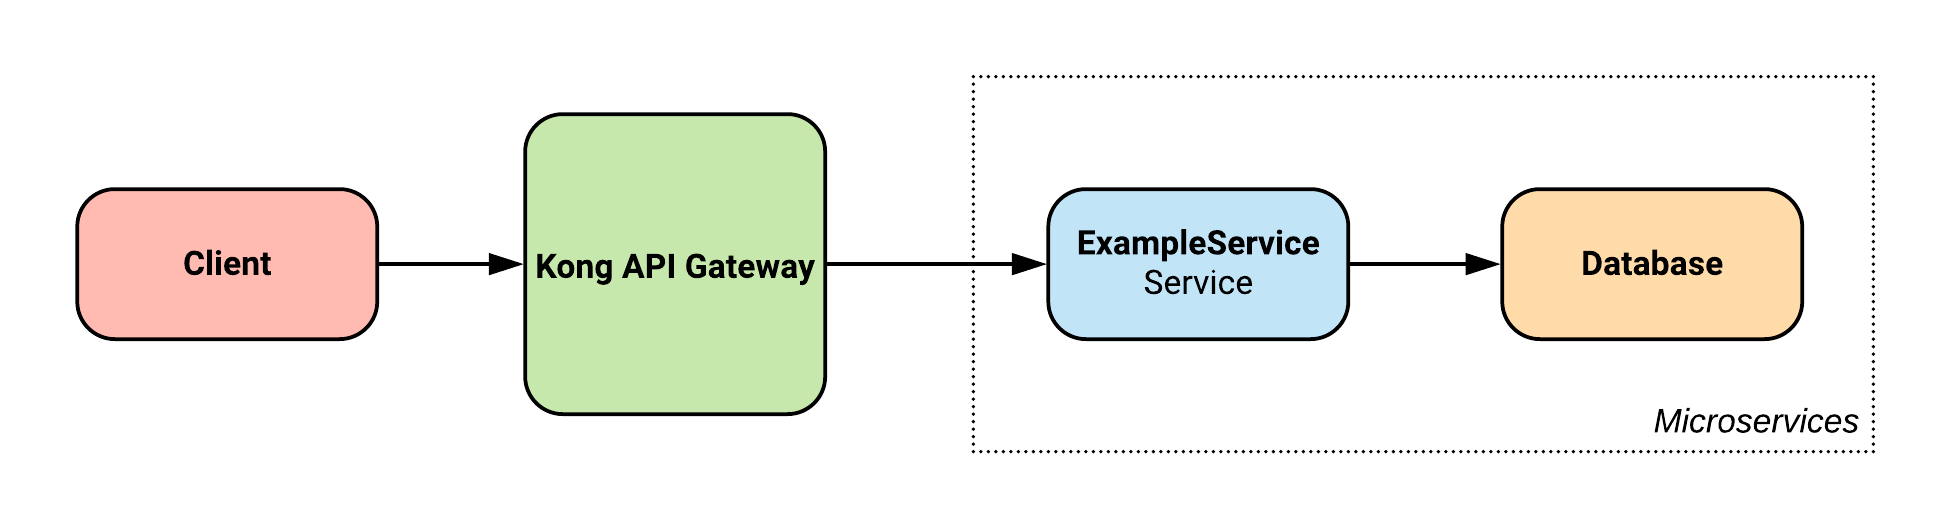
For more information on how Temple generated systems are architected, check out the System Architecture section.
Running the application
Before attempting to run the application, ensure Docker is installed and the daemon is running.
Firstly invoke the deployment script using source:
~/temple-tutorial ❯❯❯ source deploy.sh
Using source allows the KONG_ENTRY environment variable to be set, which defines the base URL for requests to be made against:
~/temple-tutorial ❯❯❯ echo $KONG_ENTRYlocalhost:8000
Making Requests
Creating an Entity
To create a new entity in the service, invoke a POST request to service's base URL, providing a JSON object that defines a value for each attribute in the Templefile:
~/temple-tutorial ❯❯❯ curl -X POST $KONG_ENTRY/api/example-service -d '{"foo" : "Hello Temple!", "bar" : 123}'{"id":"e3621abe-7e40-11ea-9934-0242c0a88002","foo":"Hello Temple!","bar":123}
The response from a CREATE request is the JSON object representing the entity stored, along with a unique identifier for that entity.
Reading an Entity
To retrieve an existing entity from the service, invoke a GET request to the service's base URL, including the ID of the entity you want to examine:
~/temple-tutorial ❯❯❯ curl -X GET $KONG_ENTRY/api/example-service/e3621abe-7e40-11ea-9934-0242c0a88002{"id":"e3621abe-7e40-11ea-9934-0242c0a88002","foo":"Hello Temple!","bar":123}
The response from the READ request is the JSON object representing the entity stored, or an error if it was not found.
Updating an Entity
To update an existing entity, invoke a PUT request to the service's base URL, including the ID of the entity you want to update, as well as a JSON object of the new attributes to store:
~/temple-tutorial ❯❯❯ curl -X PUT $KONG_ENTRY/api/example-service/e3621abe-7e40-11ea-9934-0242c0a88002 -d '{"foo": "Goodbye Temple!", "bar": 456}'{"id":"e3621abe-7e40-11ea-9934-0242c0a88002","foo":"Goodbye Temple!","bar":456}
The response from the UPDATE request is the JSON object representing the new entity stored, or an error if it was not found.
Deleting an Entity
To delete an existing entity, invoke a DELETE request to the service's base URL, including the ID of the entity you want to delete:
~/temple-tutorial ❯❯❯ curl -X DELETE $KONG_ENTRY/api/example-service/e3621abe-7e40-11ea-9934-0242c0a88002{}
The response from the DELETE request is an empty JSON object.
Next Steps
In this guide, we defined a simple data model, used Temple to generate a microservice, deployed the services locally and then performed some sample requests. Using this as a starting point, explore the full power of Temple:
- Add authentication
- Enforce access control
- Reference other service entities with foreign keys
- Add business logic with hooks
- Constrain stored values
- Generate frontend APIs with OpenAPI
- Add enumeration endpoints
- Augment with metrics
- Add your own endpoints
- Add your own database queries
- Remove endpoints from generation
- Restrict attributes to be server or client facing
- Use alternative orchestration
- Make changes to your Templefile and regenerate without losing your changes
- Test your project with Temple Test