Authentication
A crucial component of most systems is its authentication system, namely validating that the user of a system is who they claim to be. At Temple, we baked this directly into the generated architecture, so that you don't have to worry about getting the details right. In this guide, we'll show you how to add authentication to your project and how this affects the system architecture, using the example project from the Getting Started guide.
Adding Authentication to Your Project
The Getting Started guide concluded with the following example Templefile:
ExampleProject: project {#language(go);#database(postgres);#provider(dockerCompose);}ExampleService: service {foo: string;bar: int;}
To add authentication to this, we need to add two things:
- A project-level auth method metdata
- This indicates how users will log in. Currently we only support
emailauthentication, but we will be expanding this in the future.
- A service-level auth metadata
- This indicates one or many services which store metadata about your users, in addition to their authentication details.
We're going to apply these two modifications to our example Templefile by introducing a new service called ExampleUser, which will additionally store the user's name:
ExampleProject: project {#language(go);#database(postgres);#provider(dockerCompose);#authMethod(email);}ExampleUser: service {name: string;#auth;}ExampleService: service {foo: string;bar: int;}
That's it - simple, right! Under the hood, this makes lots of changes to your generated project so that:
- Users are required to login before accessing any service
- Every service requires a valid authentication token
- Created entities in each service are associated with a given user and access restricted appropriately. More information on this can be found in the Access Control guide.
Testing the Authentication Changes
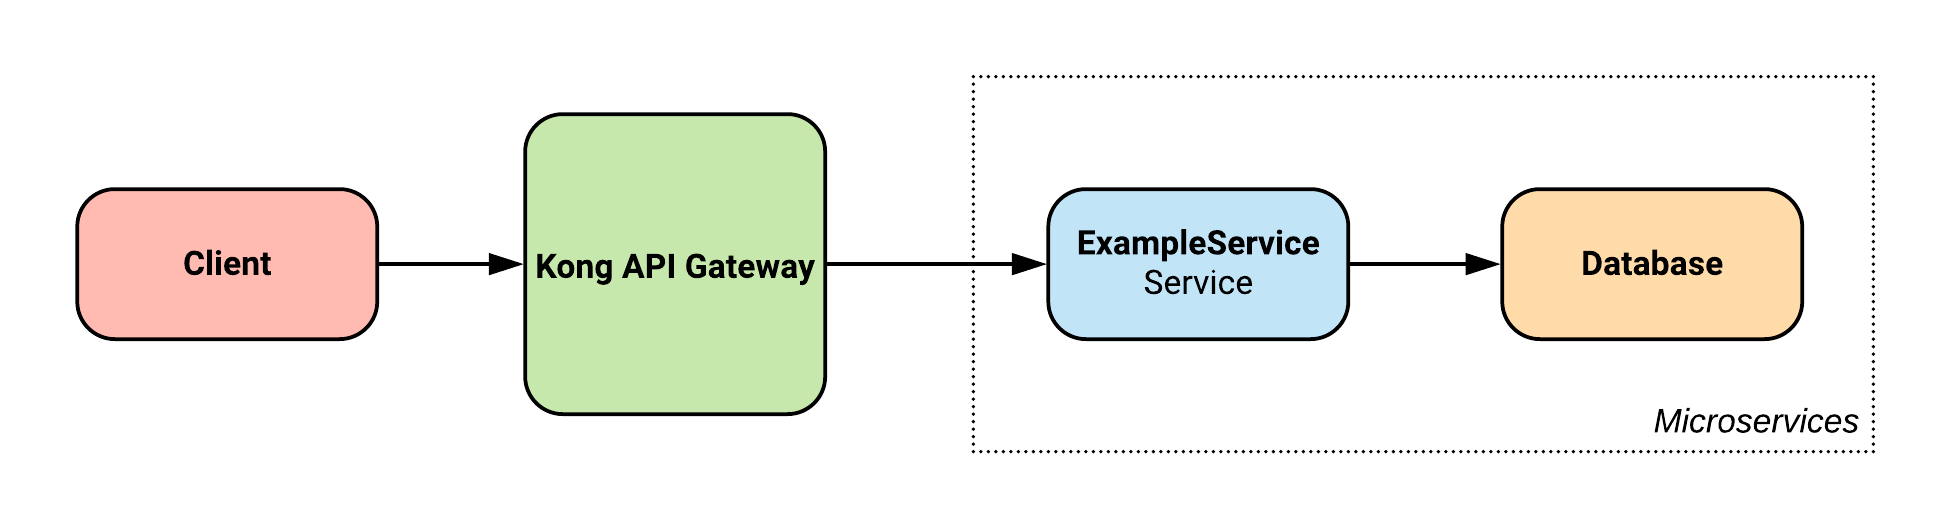
Previously, our system architecture was set out as follows:
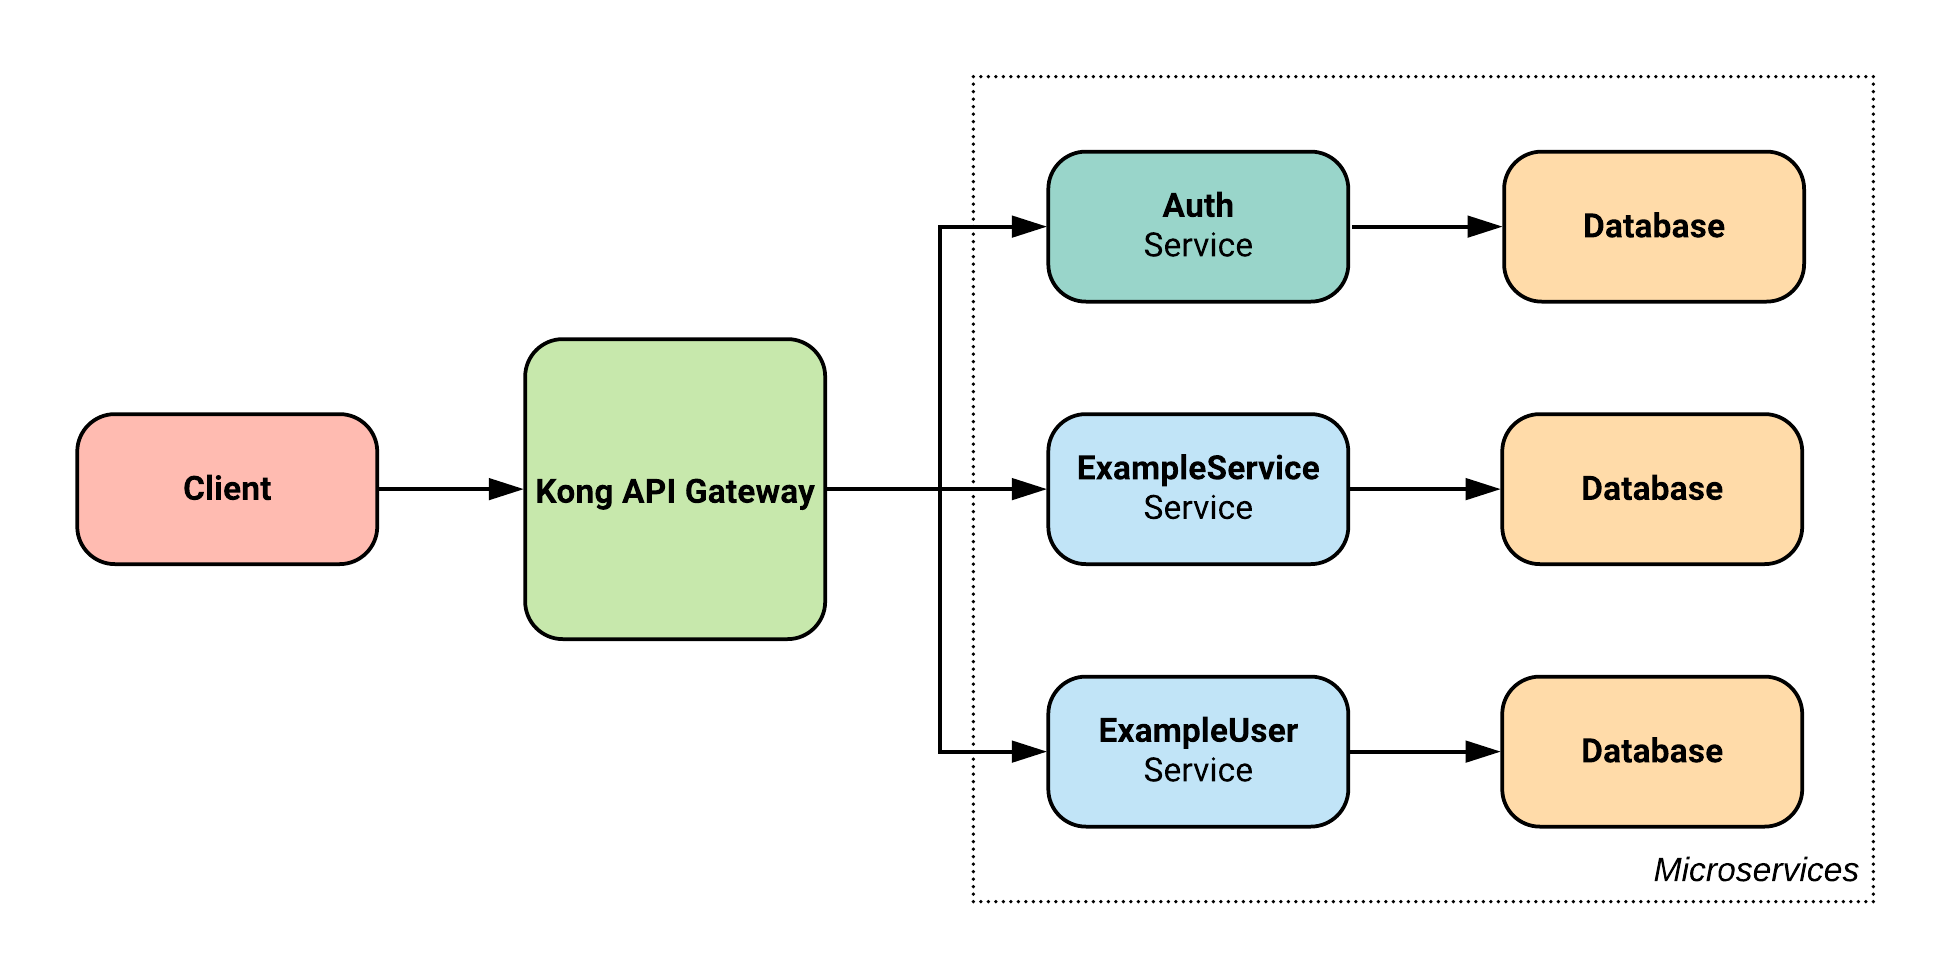
However, now we have introduced the ExampleUser service, as well as an automatically generated Auth service:
❯❯❯ source deploy.sh...❯❯❯ curl -X POST $KONG_ENTRY/api/example-service -d '{"foo": "Hello", "bar": 123}'{"message":"Unauthorized"}
Immediately we get a response back that the request is unauthorized.
To rectify this, we first need to register or login with the Auth service.
Registration and Login
The generated Auth service provides 2 endpoints: register and login.
Their names are fairly self explanatory, however let's see some examples of them in action:
Registration
The register endpoint requires a POST request with a JSON object containing an email and password key.
In response, it will return an access token that will be used to authenticate subsequent requests.
Note that we implicitly require the email address to be unique, such that one email address can only register once:
# Initial registration❯❯❯ curl -X POST $KONG_ENTRY/api/auth/register -d '{"email": "hello@temple.com", "password": "abcdefgh"}'{"AccessToken":"..."}# Subsequent registration❯❯❯ curl -X POST $KONG_ENTRY/api/auth/register -d '{"email": "hello@temple.com", "password": "abcdefgh"}'{"error":"auth already exists"}
Login
The login endpoint again requires a POST request with a JSON object containing an email and password key.
In response, it will also return an access token that will be used to authenticate subsequent requests.
If the email doesn't exist, or the password is incorrect, an error will be returned.
# Auth exists and valid credentials provided❯❯❯ curl -X POST $KONG_ENTRY/api/auth/login -d '{"email": "hello@temple.com", "password": "abcdefgh"}'{"AccessToken":"..."}# Auth exists, but password is invalid❯❯❯ curl -X POST $KONG_ENTRY/api/auth/login -d '{"email": "hello@temple.com", "password": "abcdefghijk"}'{"error":"Invalid email or password"}# Auth doesn't exist❯❯❯ curl -X POST $KONG_ENTRY/api/auth/login -d '{"email": "goodbye@temple.com", "password": "abcdefghijk"}'{"error":"Invalid email or password"}
Authenticating Requests to Other Services
Now that we are able to obtain an access token, we can make requests to other services by including the auth token in the request headers. We use the Bearer Token framework, as defined in RFC6750.
Let's consider a full example of registration, followed by a request to ExampleService:
❯❯❯ curl -X POST $KONG_ENTRY/api/auth/register -d '{"email": "test@temple.com", "password": "abcdefgh"}'{"AccessToken":"eyJhbGciOiJIUzI1NiIsInR5cCI6IkpXVCJ9.eyJleHAiOjE1ODgwMTI3OTAsImlkIjoiNGZmYjAyZDQtODdlZC0xMWVhLWE4NjktMDI0MmFjMWYwMDAzIiwiaXNzIjoiaDFNT3hwN2lhTFFOTFA4ek1RS3k2VEkzcmpuNTlsM2MifQ.xNcAdY0r98J7rzNeEWSUPDTUg5HXOCFh41ZB74tTSw0"}❯❯❯ curl -X POST $KONG_ENTRY/api/example-service -d '{"foo": "hello", "bar": 123}' -H "Authorization: Bearer eyJhbGciOiJIUzI1NiIsInR5cCI6IkpXVCJ9.eyJleHAiOjE1ODgwMTI3OTAsImlkIjoiNGZmYjAyZDQtODdlZC0xMWVhLWE4NjktMDI0MmFjMWYwMDAzIiwiaXNzIjoiaDFNT3hwN2lhTFFOTFA4ek1RS3k2VEkzcmpuNTlsM2MifQ.xNcAdY0r98J7rzNeEWSUPDTUg5HXOCFh41ZB74tTSw0"{"id":"74045036-87ed-11ea-9edc-0242c0a81003","foo":"hello","bar":123}
Now we included a valid token in the Authorization header, the request was authorized and the entity successfully created.
Services with #auth Metadata
You may have noticed that so far we have ignored the ExampleUser service we previously defined.
That's because it acts as any other service, so any example given in this guide could have been replace with a call to that service too.
However, it has one distinguishing feature: a single token is only able to create a single entity in this service.
This means means that there is at most a one-to-one mapping between an entity in the Auth service, and an entity in the ExampleUser service.
This makes the ExampleUser service perfect for storing additional metadata about a user, such as their name, address or anything that fits your business needs.
identify Endpoint
Any service that contains a #auth metadata item will also generate an identify endpoint.
Given an access token, this endpoint will redirect you to a URL where you can find information about that given entity.
The identify endpoint is accessible by making a GET request to the service's base URL.
Let's consider an example:
# Register a new auth❯❯❯ curl -X POST $KONG_ENTRY/api/auth/register -d '{"email": "test@temple.com", "password": "abcdefgh"}'{"AccessToken":"eyJhbGciOiJIUzI1NiIsInR5cCI6IkpXVCJ9.eyJleHAiOjE1ODg0MTMyMDYsImlkIjoiOWE1MTVhNzMtOGI5MS0xMWVhLTg0OTctMDI0MmFjMTUwMDAyIiwiaXNzIjoiWnFocmVTYUZSeFVFUDkyZ2pLaVBvRmNmMjd0VlZIeWcifQ.q1oQZpk9mVfGmVbxlOiuztvU2KjO_SNN1VQa3K80f_w"}# Create a new entity in ExampleUser using the auth token❯❯❯ curl -X POST $KONG_ENTRY/api/example-user -d '{"name": "Andrew"}' -H "Authorization: Bearer eyJhbGciOiJIUzI1NiIsInR5cCI6IkpXVCJ9.eyJleHAiOjE1ODg0MTMyMDYsImlkIjoiOWE1MTVhNzMtOGI5MS0xMWVhLTg0OTctMDI0MmFjMTUwMDAyIiwiaXNzIjoiWnFocmVTYUZSeFVFUDkyZ2pLaVBvRmNmMjd0VlZIeWcifQ.q1oQZpk9mVfGmVbxlOiuztvU2KjO_SNN1VQa3K80f_w"{"id":"9a515a73-8b91-11ea-8497-0242ac150002","name":"Andrew"}# Execute an identify request using the auth token❯❯❯ curl -v -X GET $KONG_ENTRY/api/example-user -H "Authorization: Bearer eyJhbGciOiJIUzI1NiIsInR5cCI6IkpXVCJ9.eyJleHAiOjE1ODg0MTMyMDYsImlkIjoiOWE1MTVhNzMtOGI5MS0xMWVhLTg0OTctMDI0MmFjMTUwMDAyIiwiaXNzIjoiWnFocmVTYUZSeFVFUDkyZ2pLaVBvRmNmMjd0VlZIeWcifQ.q1oQZpk9mVfGmVbxlOiuztvU2KjO_SNN1VQa3K80f_w"...< HTTP/1.1 302 Found< Location: http://localhost:8000/api/example-user/9a515a73-8b91-11ea-8497-0242ac150002# Using the Location header, make a follow-up request to that URL❯❯❯ curl -X GET http://localhost:8000/api/example-user/9a515a73-8b91-11ea-8497-0242ac150002 -H "Authorization: Bearer eyJhbGciOiJIUzI1NiIsInR5cCI6IkpXVCJ9.eyJleHAiOjE1ODg0MTMyMDYsImlkIjoiOWE1MTVhNzMtOGI5MS0xMWVhLTg0OTctMDI0MmFjMTUwMDAyIiwiaXNzIjoiWnFocmVTYUZSeFVFUDkyZ2pLaVBvRmNmMjd0VlZIeWcifQ.q1oQZpk9mVfGmVbxlOiuztvU2KjO_SNN1VQa3K80f_w"{"id":"9a515a73-8b91-11ea-8497-0242ac150002","name":"Andrew"}
How Authentication is Implemented
To best explain the changes made when authentication is added to your project let's consider how a new user registers with your service:
Pre-request Preparation
Before any request is even issued to your Auth service, several steps are taken:
- The
Authservice registers as a consumer with Kong (see the Kong documentation) - The
Authservice requests a new HS256 JWT credential from Kong, used to sign each token - All other services, other than
Auth, are configured through Kong to require a JWT as part of the request body
Making a Register Request
Upon making a request to the /register endpoint, the service will:
- Validate the email and password
- We currently impose a minimum 8 character limit on the passwords, but you can extend these in your custom defined hooks - see the Hooks guide for more.
- Validate that a user with that email address doesn't already exist
- Hash and salt the password using bcrypt
- Generate a UUID for that user, according to UUID version 1 of RFC4122
- Generate a HS256 JWT, using the JWT Go library, which generates JWTs according to RFC7519
These same steps are applied when logging in, except for the additional step where the stored hashed and salted password is compared against the provided password.
Making a Request to Another Service
Upon making a request to a service other than Auth, the following steps are taken before a request is executed:
- Kong validates that a JWT is included with the request, under the
Authorizationheader, with the prefixBearer, otherwise returns a 401 Unauthorized response - Kong validates the JWT comparing the
issclaim against the known secret, otherwise returns a 401 Unauthorized response - Kong validates the JWT has not yet expired, otherwise returns a 401 Unauthorized response
After this, Kong forwards the request to the necessary service.
This service will then extract the UUID from the id claim in this token and use it to associate any entity created with that specific UUID.
Future Plans
Obviously this does not provide a solution for every possible authentication scenario, so in the future we plan to:
- Expand from email authentication to include usernames, OAuth and social logins
- Include a refresh token in the register or login response, removing the need to make the user sign in every 24 hours
- Allow for more configuration of JWTs, defining custom claims or varying expiry times